Lorem ipsum dolor sit amet, consectetur adipiscing elit. Ut elit tellus, luctus nec ullamcorper mattis, pulvinar dapibus leo.
- Best AI Tools For Automation
How to Set Up Your First Instantly.ai Email Campaign within 10 mins
Jump To
When you purchase through links on our site, we may earn an affiliate commission. Here’s how it works.
Cold outreach is still one of the most effective lead generation strategies — but doing it manually burns time and limits scale.
That’s where Instantly.ai shows its real talent.
Instantly.ai is an AI-powered cold email automation tool designed for agencies, marketers, and freelancers who want to send personalised outreach emails at scale, without triggering spam filters or juggling multiple tools.
Key Reasons US Agencies Choose Instantly.ai Over Competitors Like Lemlist:
- Unlimited email accounts on most plans (no per-seat cost like Lemlist)
- AI-optimized sending patterns to improve open and reply rates
- Built-in email warmup to improve deliverability
- Smart inbox rotation to bypass Gmail limitations
- Campaign-level analytics for quick optimization decisions
If you’re a US-based agency or freelancer looking to scale your cold outreach fast, Instantly.ai offers the flexibility, speed, and deliverability edge that older tools like Lemlist often lack.
Pro Tip: US-based B2B agencies using Instantly have reported up to 35% higher open rates compared to legacy tools. Thanks to smart warmups and automated follow-ups.
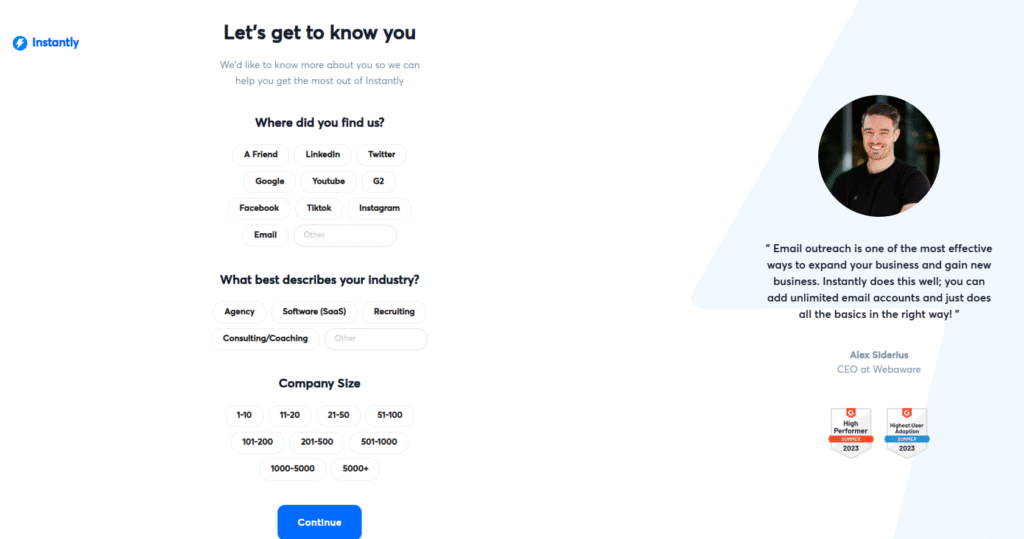
How Do You Create an Instantly.ai Account?
Starting with Instantly.ai takes less than 2 minutes, and no technical setup is required.
Here’s how US agencies and freelancers can quickly get started with their first cold email campaign setup.


Step-by-Step Instantly Email Setup:
- Visit instantly.ai and click “Start Free Trial”
→ No credit card required - Enter basic details
- First name
- Last name
- Business email
- Password
- Agree to the terms and click “Join Now”
- Verify your email
- Check your inbox for a confirmation email
- Click the link to activate your account
- You’ll be redirected to your Instantly dashboard
That’s it. Answer the questions in the image below— your Instantly account is now live.
What’s the Best Instantly.ai Plan?
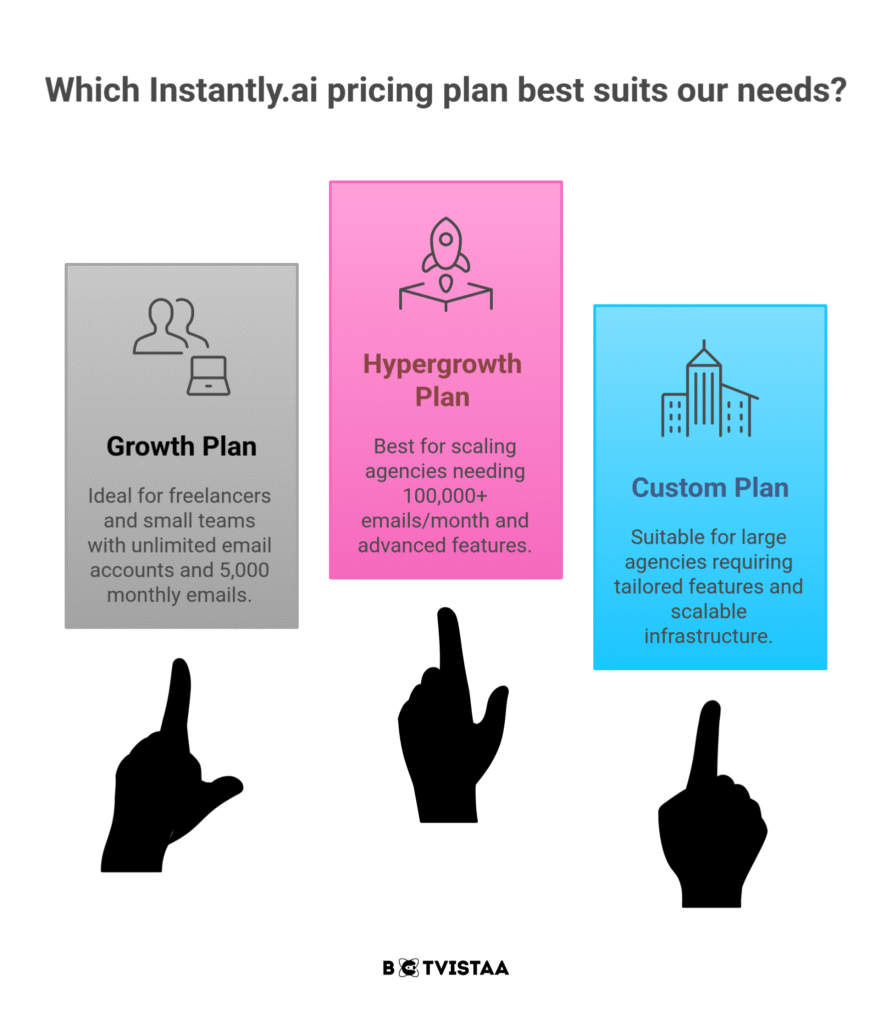
Pro Tip: For most US-based cold email campaigns, the Growth plan offers all the essentials to get started — no seat limits, no technical hassle, and everything you need to automate outreach fast.
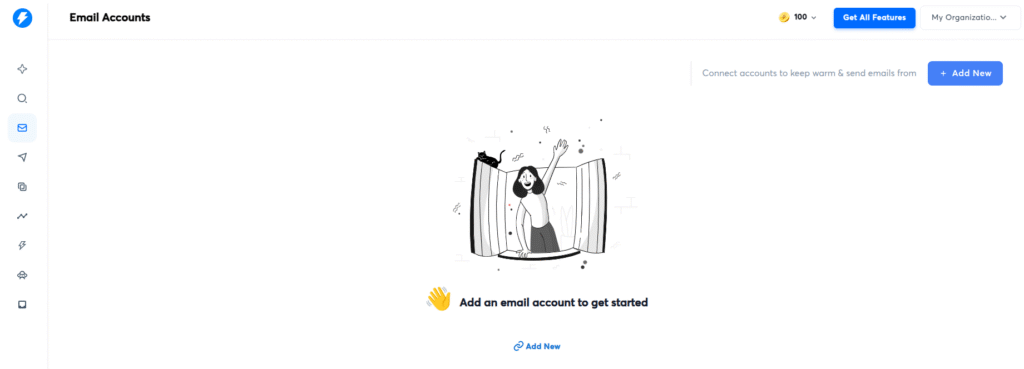
How Do You Connect Your Email Account to Instantly.ai?
Before launching your first cold email campaign, you need to connect your sending email account to Instantly.ai.
This step is simple, but it’s critical for deliverability and inbox placement — especially if you’re targeting leads in the US or abroad.
Steps to Add Your Email Account in Instantly.ai:
- Go to your Instantly dashboard
- Click “Add New” in the top right corner.
- Choose your provider:
- Gmail (most common)
- Outlook / Office365
- Custom SMTP (for business domains)
Instantly supports multiple sending accounts, making it ideal for scaling outreach across campaigns, without incurring extra seat costs like other tools.
How to Enable IMAP and Set Up App Passwords for Gmail?
If you’re using Gmail for your cold email campaign, you’ll need to enable IMAP and generate an app password — this allows Instantly.ai to send emails securely on your behalf.
Here’s how US-based agencies and freelancers can do it step by step:
Step 1: Enable IMAP in Gmail
- Go to Gmail.com and log in to your sending email account
- Click the gear icon (⚙️) → See All Settings
- Go to the “Forwarding and POP/IMAP” tab
- Under IMAP access, select “Enable IMAP”
- Scroll down and click Save Changes
IMAP allows Instantly.ai to access your Gmail inbox and send messages from your account.
Step 2: Enable 2-Step Verification in Google
- Visit Google My Account – Security
- Under “Signing in to Google,” click 2-Step Verification
- Follow the prompts to set it up (you’ll need your phone)
Google requires 2-Step Verification to generate secure app passwords — this protects your Gmail account from unauthorized access.
Step 3: Generate an App Password
- After enabling 2-Step Verification, go back to Google Security Settings
- Click on “App passwords”
- Sign in again if prompted
- Select “Other (Custom name)” → Type “Instantly”
- Click Generate
You’ll get a 16-character password. Copy it — this is what you’ll paste into Instantly.ai.
Step 4: Finalize Email Connection in Instantly.ai
- Return to your Instantly dashboard → Add Email Account
- Enter your Gmail address
- Paste the app password you just generated
- Click “Connect”
Your Gmail account is now securely connected to Instantly.ai.
Pro Tip: Never share your app password. If needed, you can delete and regenerate a new one instantly from Google’s security settings.
How to Create Your First Cold Email Campaign in Instantly?
Now that your account and email are connected, it’s time to build your first Instantly.ai cold email campaign — and yes, you can do it in under 10 minutes.
Follow these steps to set up a campaign that drives real replies, not spam folder drops.
Step-by-Step: Cold Email Campaign Setup
- Go to the “Campaigns” tab in your Instantly dashboard
- Click “Add New” → Name your campaign (e.g., “June Outreach – B2B USA”)
- Select the email account(s) you want to use for this campaign
- Click “Continue”
Import Your Leads
You’ll now be asked to upload your contact list.
You have two options:
- Upload a CSV (recommended)
- Connect Google Sheets for dynamic sync
Make sure your sheet includes columns like:
- First Name
- Last Name
- Company
- Email Address
- LinkedIn Profile
- Custom Personalisation Tags
During import, you’ll match each column to Instantly’s field names.
Choose “Do not import” for any unnecessary fields.
Compose Your Cold Email
- Add your subject line (make it relevant and curiosity-driven)
- Write your email body using personalisation tags like {first_name}
- Click “Add Step” to include automated follow-ups
- Use Instantly’s preview tool to check how your message looks for each lead
Personalisation Tip: Use variables like {company_name} or {compliment} to keep your message relevant — US-based prospects engage more with messages that feel 1:1.
Add Follow-Up Sequences (Optional but Powerful)
- Click “Add Step” under your first email
- Set a delay in days after no reply
- Write a short follow-up that adds value or social proof
- You can repeat this for multiple steps (but keep it natural)
Pro Tip: Test different subject lines using A/B testing in paid plans to find the one that boosts open rates in your market (e.g., SaaS, legal, creative agencies in the US).
How to Import Leads into Instantly.ai? (CSV or Google Sheets)
Your email campaign is only as good as the leads behind it.
With Instantly.ai, importing lead data is fast, clean, and flexible — perfect for US-based B2B marketers targeting specific industries or titles.
Option 1: Upload a CSV File
- In your campaign dashboard, click “Import Leads”
- Select “Upload CSV”
- Choose your file — make sure it’s properly formatted with clean headers
- During import, match each column to Instantly’s fields
- Choose “Do Not Import” for irrelevant fields
- Click Upload All
Make sure your data is verified. Use tools like NeverBounce or ZeroBounce to avoid high bounce rates.
Option 2: Connect a Google Sheet
- Choose “Import from Google Sheets”
- Authorise your Google account
- Select your spreadsheet and tab
- Map the columns just like a CSV upload
This method is ideal if your team updates lead data frequently — your campaigns stay current without manual uploads.
Leads are now added to your campaign and are ready for message personalisation.
How to Write a High-Converting Cold Email in Instantly.ai?
Most cold emails fail because they sound cold.
Inside Instantly.ai, you can write hyper-personalised emails that feel like real conversations — and get real replies.
Step-by-Step: Writing Your Cold Email
From your campaign screen, click “Add Email Step”
Write a subject line that sparks curiosity or relevance
“Quick idea for {company_name}”
“Saw this about {first_name} — had to reach out”
Draft your message using personalisation variables:
Hey {first_name},
I came across {company_name} while researching {industry_topic}, and I was impressed by {compliment/custom_variable}.
I specialise in helping US-based B2B agencies like yours solve {pain_point} using AI-driven email strategies.
Would love to share a quick idea — would Thursday work for a quick call?
Best,
{your_name}
Tips for High-Converting Cold Emails (That Don’t Land in Spam):
Keep it short: 50–125 words
Focus on one clear CTA (e.g., “Are you open to a quick chat?”)
Use one link or none in the first email
Avoid trigger words like “free,” “guaranteed,” or “buy now”
Preview and Test Before You Launch
Use Instantly’s email preview feature
→ See how each message will look with real lead dataDouble-check merge tags like {first_name}, {company_name}
Use the “Send Test Email” option to review in your inbox
Pro Tip: Save your email copy as a template if you’ll be using variations across multiple campaigns.
How to Set Up Automatic Follow-Up Emails?
Most replies don’t come from the first cold email — they come from your follow-up.
With Instantly.ai, you can build fully automated, personalised follow-up sequences that run on autopilot, so you never miss a lead.
Step-by-Step: Add Automated Follow-Ups in Instantly.ai
Inside your campaign, click “Add Step” under your main email
Set the delay (e.g., 3 days after no reply)
Write your follow-up email
→ Keep it short, value-driven, and naturalRepeat to add multiple follow-ups (optional but recommended)
Use variables like {first_name}, {company_name}, or {pain_point} to keep it relevant
Example Follow-Up Sequence
Email #1 (Day 0):
Initial pitch or idea
Follow-Up #1 (Day 3):
“Hey {first_name}, just floating this back to the top of your inbox…”
Follow-Up #2 (Day 7):
“Would it make sense to explore this next quarter?”
Follow-Up #3 (Day 12):
“I’ll close the loop here, but if this becomes relevant — happy to reconnect.”
Pro Tip: US-based B2B decision-makers often reply on the 2nd or 3rd email — don’t stop too early.
Instantly Follow-Up Features You Can Enable
Auto-stop on reply (saves your reputation)
Email step scheduling by day/time
AI-optimised sending pattern (paid feature)
Open/click tracking (optional but insightful)
Pro Tip: Keep the tone helpful and polite. Cold email works best when it feels like a conversation, not a chase.
How Do You Schedule and Launch Your Email Campaign?
You’ve written your emails and set your follow-ups — now it’s time to schedule and go live.
Instantly.ai gives you full control over when and how your emails go out, helping you stay compliant and effective.
Step-by-Step: Schedule Your Cold Email Campaign
- In your campaign dashboard, go to the “Schedule” tab
- Choose your sending days
- Weekdays (e.g., Mon–Fri)
- Avoid weekends for B2B leads
- Set your time zone — select the US region where your leads are located (e.g., PST, EST)
- Limit your daily sending volume
- Start with 25–30 emails per day per account
- Increase gradually to protect your domain
Optional Sending Settings to Enable
- Open tracking
- Reply tracking
- Stop sending if a reply is detected
- Use AI to optimise sending patterns (optional but great for larger campaigns)
Launch Your Campaign
Once everything looks good:
- Click “Launch Campaign”
- Instantly will start sending based on your schedule and rules
- You’ll see results in real time via the Analytics tab
Track open rates, reply rates, and bounce rates, and tweak your copy or lead sources as needed.
Pro Tip: Monitor early performance. If open rates are low, test subject lines. If bounce rates are high, clean your lead list or reduce volume.
What Key Settings Should You Enable for Best Results in Instantly?
Your cold email campaign is live — but without smart settings, you risk poor deliverability or missed replies.
Here’s how to configure Instantly.ai for maximum performance and safe scaling, especially for US-based B2B agencies.
Essential Instantly Settings to Turn On
- Warm-Up (Enable Immediately)
- Gradually warms your sending domain
- Reduces risk of emails going to spam
- Auto-enabled on most plans — make sure it’s active
- Stop on Reply
- Automatically pauses the sequence once someone replies
- Prevents awkward follow-ups after a conversation starts
- Daily Send Limit
- Start low: 25–30 emails/day/account
- Gradually increase to 50–100 based on performance
- Helps protect your domain and inbox reputation
- Open & Click Tracking
- Tracks which leads are engaging with your emails
- Optional — use wisely if you’re focused on deliverability
- AI Optimised Sending Pattern (Optional)
- Adjusts send times based on when your leads are most likely to open
- Best used by larger agencies running multi-vertical campaigns
Other Instantly Settings to Review
- Time Zone Syncing
→ Match your sending schedule to your lead’s region (e.g., US East Coast or West Coast) - Global Blocklist
→ Avoid emailing bad-fit or known spam-reporting domains - Bounce Detection
→ Auto-removes bounced leads to keep your list healthy
Pro Tip for Agencies: These settings are the secret sauce to running high-volume cold email campaigns without burning domains. Don’t skip them — review before every launch.
FAQS
How do I create a campaign in Instantly AI?
To create a campaign in Instantly.ai, go to the “Campaigns” tab and click “Add New.” Choose your email account, import leads via CSV or Google Sheets, write your email, add follow-ups, and schedule sending times. Then click “Launch Campaign.”
Subscribe To Our Newsletter
How long does it take to set up an email campaign?
With Instantly.ai, a full cold email campaign — including account setup, lead import, personalization, and scheduling — can be launched in under 10 minutes, especially if your lead list is ready.
How do I add leads to Instantly AI?
Go to your campaign dashboard, click “Import Leads,” and either upload a CSV file or connect a Google Sheet. Make sure to match columns like email, first name, company, and any custom variables for personalization.
What is the daily limit for an Instantly.ai campaign?
To protect your domain and inbox health, it’s best to start with 25–30 emails per day per account. As your sender reputation improves, you can gradually increase this to 50–100 per day.
Why should agencies choose Instantly over other tools?
Unlike many competitors, Instantly.ai offers unlimited sending accounts, built-in warm-ups, smart AI send timing, and automated follow-ups — all optimized for B2B outreach scalability, especially in US markets.

Saleha
- Best AI Tools For Automation
Our Recent
Blogs
How to Set Up Your First Instantly.ai Email Campaign within 10 mins

Content Writing and Optimization with NeuronWriter: Step-by-Step Guide